Free Download Uvpackmaster 3. If you’re a Blender user looking to elevate your UV mapping workflows, look no further than UVPackmaster 3. This latest release not only continues to drastically cut down UV packing times by utilizing both CPU and GPU, but it also introduces advanced features like an innovative UV aligning algorithm and scriptable architecture. Whether for personal projects or high-end professional demands, UVPackmaster 3 offers unmatched efficiency and flexibility. Don’t miss out on the opportunity to upgrade your toolkit with these powerful new enhancements.
What is Uvpackmaster 3?
UVPackmaster 3 is an advanced UV packing solution designed to work seamlessly with Blender. This tool significantly improves efficiency by allowing simultaneous use of CPU and GPUs, reducing complex packing scenarios to mere seconds. Not just for packing, UVPackmaster 3 also introduces new features like a sophisticated UV aligning/stacking algorithm, enhancing overall workflow. With the addition of a scriptable architecture and lifetime updates, this tool offers maximum flexibility and continued improvement for its users. Visit Blender Market for more details and upgrade options.
Overview of Uvpackmaster 3
Introducing UVPackmaster 3, the latest advancement in UV packing technology, specifically designed for Blender users. This new release not only accelerates your UV packing process by using both CPU and GPU resources simultaneously but also introduces an innovative UV aligning/stacking algorithm, enhancing your workflow efficiency. With its scriptable architecture, UVPackmaster 3 offers unprecedented flexibility, allowing you to customize operations to fit intricate workflows. Plus, investing in UVPackmaster 3 means securing a lifetime license with free future updates, ensuring you always have the most advanced tools at your fingertips. Whether you’re upgrading from UVPackmaster 2 or new to the software, expect a seamless experience across Windows, Linux, and Mac platforms, supported by comprehensive documentation and responsive support.
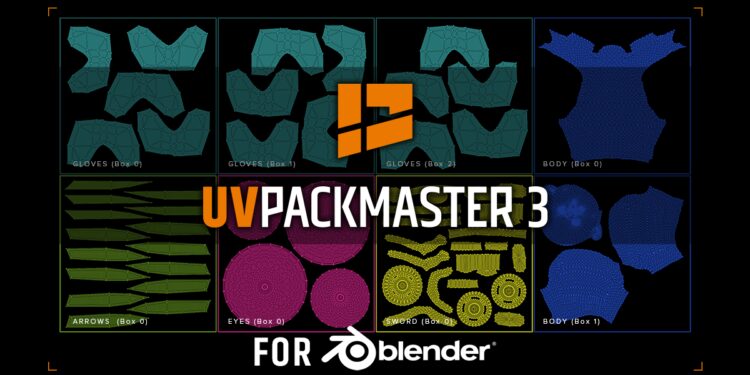
– UVPackmaster 3 leverages your system’s full capability by packing UV maps using both the CPU and all available GPUs, significantly reducing the time required for complex tasks.
– Beyond just packing, this version introduces enhanced tools for UV alignment and stacking, making it more than a packing solution—it’s a comprehensive UV workflow enhancer.
– With a scriptable Python-embedded engine, UVPackmaster 3 adapts to the most demanding user-defined workflows, offering flexibility and control like never before.
Features of Uvpackmaster 3
- Integration with Blender: Uvpackmaster 3 is optimized for use with Blender, enhancing workflow and compatibility.
- Simultaneous CPU and GPU Packing: Uses both CPU and all GPUs available in the system to significantly reduce UV packing time.
- Cuda-Accelerated Technology: The inclusion of a Cuda-accelerated variant ensures superior performance when running on GPU.
- Advanced UV Aligning/Stacking Algorithm: Introduces new tools for better alignment and stacking, making it more than just a packing tool.
- Scriptable Architecture: Features a scriptable architecture with embedded Python, allowing for customized operation logic.
- Lifetime License with Free Updates: Purchasing Uvpackmaster 3 grants a lifetime license and free future updates.
- Comprehensive Support and Documentation: Users have access to detailed documentation, a dedicated forum, and email support for assistance.
- Enhanced Packing Functionalities: Offers sophisticated packing features that are not available in other UV packers.
- Multi-Platform Support: Compatible with Windows, Linux, and Mac operating systems.
- Integration with Zen UV Addon: Now also supported by Zen UV addon, broadening its utility.
This comprehensive suite of features makes Uvpackmaster 3 a versatile and powerful tool for anyone using Blender for their 3D modeling and animation projects, ensuring efficient workflows and improved performance.
How to install Uvpackmaster 3
If you’re looking to add the Uvpackmaster 3 template to your Blender setup, just follow these straightforward steps:
1. Begin by downloading the Uvpackmaster 3 plugin from its official website.
2. Open Blender and navigate to Edit located on the top menu.
3. In the drop-down menu, click on Preferences to access the settings.
4. In the Preferences window, select File Paths located on the left sidebar.
5. Look for Asset Library in the File Paths section and click on it.
6. Here, you will see an option to add a new path. Click this and navigate to the folder where you downloaded the Uvpackmaster 3 plugin.
7. Select the plugin’s folder, confirm your choice, and close the Preferences window by clicking on the ‘Save & Close’ button.
8. Restart Blender to ensure the plugin is properly loaded and ready to use.
By following these steps, your Uvpackmaster 3 plugin should be completely integrated into Blender, making it ready for your next 3D project.
 Join the club to get access